
TL;DR
Acoustic dampening isn’t just foam — it’s about placement, barriers, and reducing reflections. Moving your rig into a closet with proper ventilation can create a quiet, focused space, but it needs careful planning to avoid heat buildup and low-frequency issues.
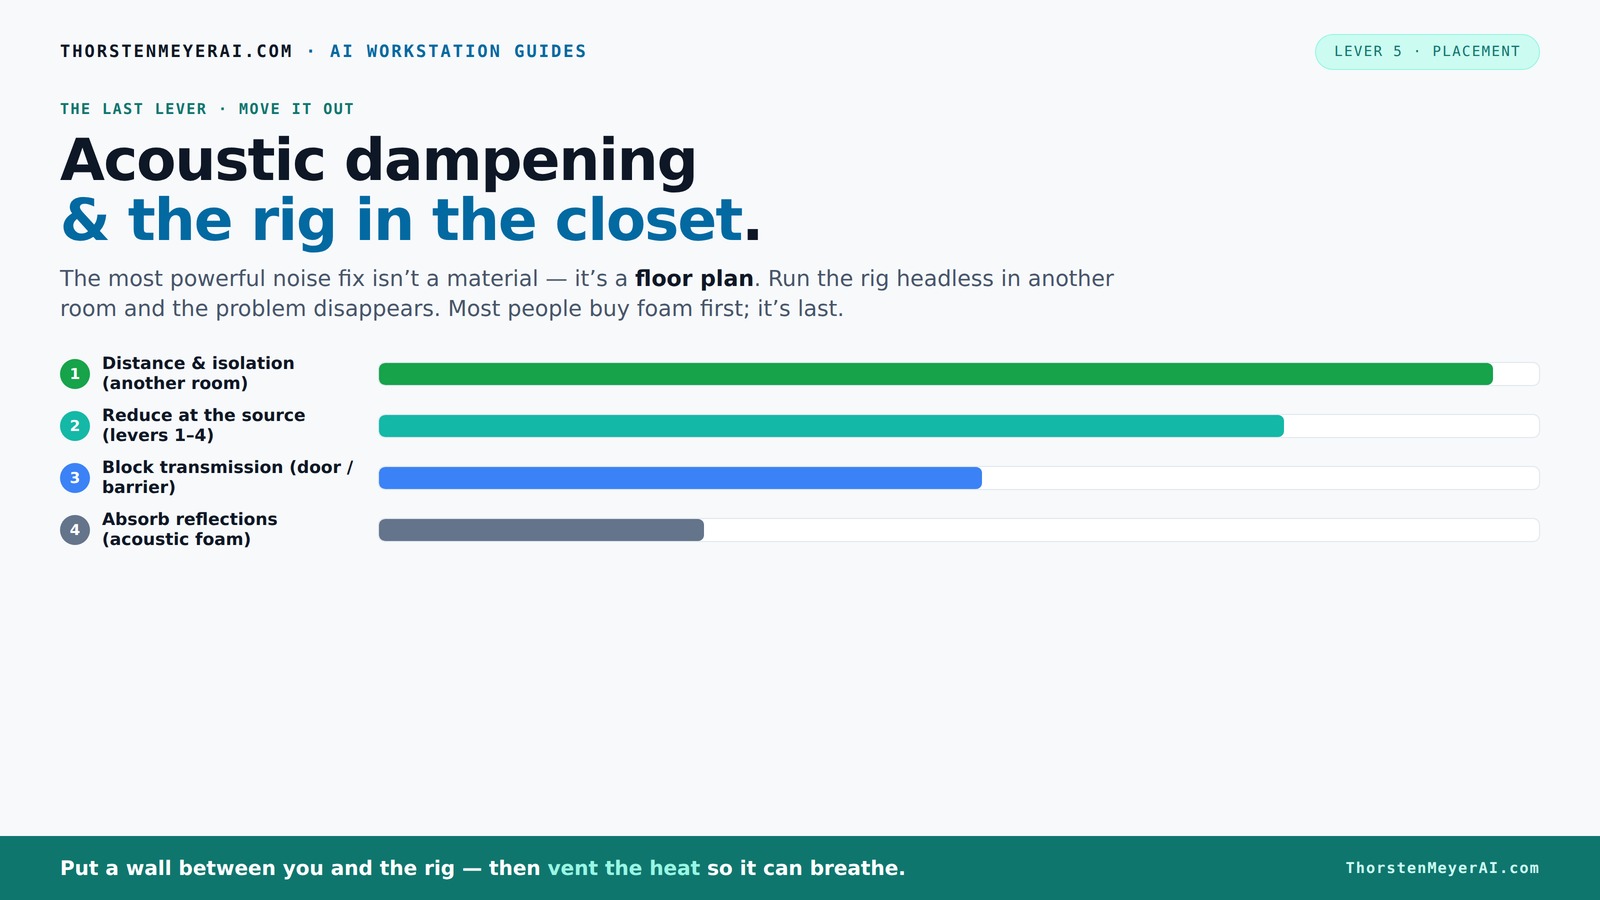
Acoustic dampening
& the rig in the closet.
The most powerful noise fix isn’t a material — it’s a floor plan. A rig you can’t hear because it’s in another room beats any amount of foam. Tap the approaches in Part 1 to see what actually works.
(another room)
(levers 1–4)
(door / barrier)
(acoustic foam)
Contain the noise, not the heat
Key Takeaways
- Prioritize distance and barriers; moving your rig into another room is the most effective noise reduction.
- Use placement strategies to treat first reflection points, especially behind and around the mic, with blankets or acoustic panels.
- Seal gaps around the closet door and walls to block sound leaks, not just add foam or panels.
- Ensure proper ventilation—passive vents or quiet exhaust fans prevent overheating and noise from fans in a closet rig.
- Soft materials, bass traps, and reflection filters greatly improve sound quality in small spaces.

Focusound 52 Pack Acoustic Foam Panels 1" x 12" x 12" Sound Proof Foam Panles Soundproofing Noise Cancelling Wedge Panels for Home Office Recoding Studio with 300PCS Double-Side Adhesive
Soundproofing - Acoustic foam panels triangular grooves structure for better noise absorption, helps to reduce and absorb unwanted...
As an affiliate, we earn on qualifying purchases.
As an affiliate, we earn on qualifying purchases.
What Acoustic Dampening Really Means — More Than Just foam, it’s about reducing reflections and reverberation inside your space, not just blocking sound from escaping. Foam panels absorb high-frequency echoes, making your voice clearer and less harsh. But they don’t stop sound from leaking out — that’s soundproofing. Learn more about acoustic dampening and placement techniques.
Acoustic dampening is about reducing unwanted reflections and reverberation inside your space, not just blocking sound from escaping. Foam panels absorb high-frequency echoes, making your voice clearer and less harsh. But they don’t stop sound from leaking out — that’s soundproofing.
Imagine speaking in a canyon versus a padded room. Foam makes the canyon sound like a padded room, but it doesn’t block the canyon’s roar from reaching your neighbor’s house. That’s why placement and barriers matter more than just slapping foam on walls.
Understanding the distinction helps you prioritize your efforts: dampening improves clarity and reduces echo, which is crucial for accurate recordings. However, if your goal is to prevent sound from escaping, additional measures like sealing gaps or adding mass are necessary. Recognizing this difference guides you to use the right materials for each purpose, avoiding ineffective over-investment in foam where barriers are needed more.

Audimute Soundproofing Acoustic Door Seal Kit - Door Sweep and Seal - (Large Size)
Includes (2) Door Seals (3/16" x 1/2" x 50') and (1) Door Sweep (1/2" x 1.5" x 25').
As an affiliate, we earn on qualifying purchases.
As an affiliate, we earn on qualifying purchases.
Where to Put Acoustic Treatment for Maximum Effect
The biggest gains come from placing soft, absorbent materials at the points where sound bounces first — the 'first reflection points.' Use a mirror and a friend to find these spots behind and around your microphone. Cover nearby hard surfaces like walls, ceiling, and the door with blankets, acoustic panels, or rugs. For more detailed tips, check out this guide on acoustic treatment placement.
For example, if your mic faces the closet door, treat that door with heavy blankets or foam. The corner where your wall meets the ceiling often traps bass and needs bass traps or additional insulation.
Think of your closet as a tiny echo chamber. Cover the walls, ceiling, and door gaps first. This coverage, combined with smart placement, makes a noticeable difference.
Deeply understanding where sound reflections originate allows you to target your treatment more effectively. For instance, treating only the first reflection points can dramatically improve clarity without overloading your space with material. Conversely, neglecting corners or the ceiling can leave problematic frequencies or echoes that muddy your recordings. The tradeoff is balancing coverage with space constraints—over-treating can make the space sound unnatural or overly dead, while under-treating leaves echoes that compromise quality.

Sound Addicted - Studio Monitor Isolation Pads for 5 Inch Monitors, Pair of Two High Density Acoustic Foam which Fits Most Speaker Stands | SMPad 5
SMPad 5 is made out of the highest quality acoustical foam (50kg/m^3 density).
As an affiliate, we earn on qualifying purchases.
As an affiliate, we earn on qualifying purchases.
How to Soundproof Your Closet — Seal, Add Mass, and Block Leaks
Soundproofing a closet isn’t just about acoustic panels; it’s about sealing gaps and adding mass. Weatherstripping around the door, sealing cracks with acoustic sealant, and adding extra drywall or mass-loaded vinyl can cut down on sound leaks. For more on effective soundproofing techniques, visit this resource on soundproofing.
For example, a simple door sweep with weatherstripping can reduce noise leaks by 50%. Add a second drywall layer or mass-loaded vinyl to walls for even better isolation. Remember, even tiny gaps or cracks can let sound escape, so treat every opening.
Effective soundproofing involves understanding the physics of sound transmission: mass and airtightness are your best tools. Increasing mass makes it harder for sound waves to pass through, while sealing gaps prevents sound leaks. The tradeoff is that adding too much mass or sealing excessively can make access difficult or reduce ventilation, so you need a balanced approach. Properly executed, these methods significantly improve isolation, but overdoing it can lead to a cramped, poorly ventilated space.
ventilated closet acoustic treatment
As an affiliate, we earn on qualifying purchases.
As an affiliate, we earn on qualifying purchases.
Placing Your Gear and Ventilation — Keep it Cool and Quiet
Moving your rig into a closet is smart for noise, but it introduces the heat problem. Continuous operation at high load dumps hundreds of watts in a tiny space, risking overheating and fan noise. Proper ventilation is essential to keep your equipment running smoothly. Learn more about effective ventilation solutions at this guide on closet ventilation.
Use passive vents or quiet exhaust fans to circulate hot air out. Don’t fully seal the space unless you add a thermostat-controlled airflow system or a dedicated soundproof cabinet. For example, a small, ducted exhaust can keep your system cool without sacrificing silence.
Understanding the implications of heat buildup is crucial: overheating can damage your equipment and increase noise from cooling fans. The tradeoff is between maintaining silence and ensuring adequate airflow. Ignoring this can lead to system failures or compromised sound quality. Selecting the right ventilation method—like low-noise fans or passive vents—ensures your gear stays cool without introducing unwanted noise or drafts, preserving the integrity of your recordings.
What Gear Works Best in a Closet Setup — From Blankets to Bass Traps
In a closet, soft materials are your best friends. Thick blankets, moving pads, and plush rugs soak up reflections and reduce flutter echoes. Add bass traps in corners if low-end buildup happens. Reflection filters behind the mic can also focus your voice and block unwanted room noise.
For example, a thick moving blanket hung on the door and over the walls can cut reverb by 70%. Combine that with a bass trap in the corner, and your voice sounds tight and controlled.
Choosing the right gear involves understanding how different materials absorb specific frequencies. Thick, dense fabrics excel at high frequencies, but low frequencies often require bass traps or specialized acoustic treatments. Reflection filters are effective at reducing room sound but should be used in conjunction with other treatments for comprehensive control. Power strips and cable management are essential for safety and organization—clutter can cause accidental disconnections or hazards, especially in tight spots. The tradeoff is balancing effective treatment with accessibility and airflow—overcrowding can hinder ventilation and make adjustments difficult.
Common Mistakes and How to Avoid Them
Many beginners rely only on foam panels and forget to seal the door or treat the low frequencies. Overpacking the closet with gear causes low-frequency buildup, making sounds muddy and boomy. Ignoring ventilation can lead to overheating and fan noise.
For example, sealing gaps around the door with weatherstripping can cut noise leaks in half. Adding bass traps prevents low-end muddiness. Planning your gear placement and airflow saves headaches later.
Understanding the implications of these mistakes is key: poor sealing allows sound to escape, reducing your recording quality and disturbing neighbors. Excess low-frequency buildup creates a muddy sound that’s hard to correct later. Overheating can damage equipment or cause fan noise, degrading audio quality. The tradeoff involves balancing soundproofing, acoustic treatment, and ventilation—neglecting any can compromise your entire setup. Proper planning and execution prevent these issues, ensuring a cleaner, safer, and more effective recording environment.